KMail/Способи резервного копіювання даних
Способи резервного копіювання даних
У KMail, програмі для керування електронною поштою у KDE, передбачено декілька варіантів резервного копіювання даних.
Архівування
Або контекстне меню, яке можна відкрити клацанням правою кнопкою миші з наступним вибором пункту У відповідь буде відкрито діалогове вікно, за допомогою якого ви зможете створити окремий архів для поточної позначеної теки. Назва файла архіву складатиметься з префікса Archive_, , шляху до вказаної теки у ієрархії тек KMail, дати у форматі рік-місяць-день та вибраного суфікса назви файла, наприклад Archive_Local Folder_inbox_2013-09-03.tar.bz2.
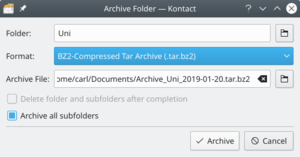
Тека: тут буде показано поточну позначену теку. Якщо ви хочете змінити теку, вміст якої буде архівовано, натисніть піктограму із зображенням теки.
Формат: за допомогою цього спадного списку можна вибрати формат архіву (можливі варіанти: zip, tar, tar.bz2 та tar.gz).
Якщо вам потрібно змінити типову назву або розташування архіву, натисніть піктограму теки наприкінці поля «Файл архіву».
Позначте пункт , якщо всі заархівовані дані слід вилучити після архівування.
Типово, буде зархівовано усі підтеки. Зніміть позначку з пункту , якщо слід заархівувати лише записи з основної теки.
Це потужний інструмент, яким можна скористатися для полегшення резервного копіювання вашої пошти у автоматичному режимі. Назва файла архіву складатиметься з префікса Archive_, шляху до вказаної теки у ієрархії тек 'KMail', дати у форматі рік-місяць-день та вибраного суфікса назви файла, наприклад Archive_Local Folder_inbox_2013-09-03.tar.bz2.
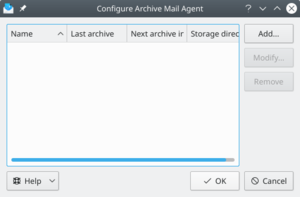
Спочатку виберіть теку, вміст якої слід архівувати, натисканням кнопки .
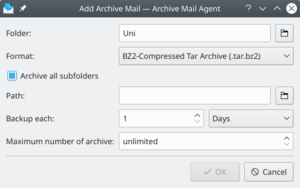
Виберіть формат зберігання даних, наприклад .tar.bz2, за допомогою спадного списку.
Типово буде позначено пункт . Зніміть позначку з цього пункту, якщо ви хочете архівувати дані лише з основної теки.
You can type in the location you would like to save your archive, or click the Open File Dialog button to select the folder.
Select how often you wish to backup through the drop down menus next to .
- If you are limited on drive space you will want to set a limit on Maximum number of archive.
- If you have added or modified an archive job it will be executed automatically after closing the dialog.
- If you have already added mail archive jobs the Configure Archive Mail Agent dialog will list and allow to modify them.
You can use the check box at the left of each entry in the list to enable or disable archiving of this job.
Using the context menu launched with a right mouse button click on an archive job you can open the folder containing the archives or start the archive job immediately.
This feature allows you to archive single emails to a specified folder.
For instance, you need to archive all of those pesky bill receipts in one place. Folder Archive Agent can easily accommodate those needs.
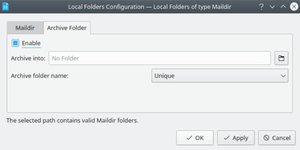
This dialog will have a tab for each of your configured accounts including Local Folders and you will need to configure all accounts that you wish to use this feature with.
The first option allows you to enable/disable the folder archive agent. It is disabled by default, to enable check the Enable check box.
You can set the location of your Archive folder by clicking the folder icon next to Folder: and selecting the folder you wish to use.
For example, you could create a folder called “bill receipts” by clicking the New Subfolder... and typing bill receipts in the dialog. You may choose a folder location anywhere, e.g... a folder in your “Local Folders” or on your IMAP server.
You have several choices on how the emails will be archived:
- Unique folder - Uses the selected folder sorted by date.
- Folder by months - Creates new folders inside the selected folder by months.
- Folder by years - Creates new folders inside the selected folder by years.
Now when you receive a bill receipt, right mouse button the email and select Archive from the menu. The email will be archived into your configured archive folder for easy viewing later on.
Exporting
Or pimsettingexporter can be run as a standalone application by running pimsettingexporter in the application launcher.
This feature exports settings and local mail to a compressed file.
Backing up is an essential practice for all users. PIM Setting Exporter is a great tool for backing up or moving all of your settings and email to a new installation. You also use PIM Setting Exporter to import previous backups.
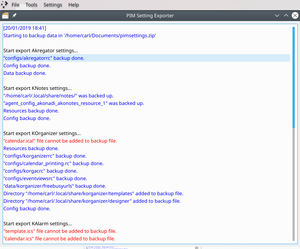
To perform a backup, select , it will prompt you to close all kdepim applications.
Once you have closed them, click to continue, or to cancel.
You will be prompted to create a backup name, enter the name into the File textbox, e.g. mymailsettings.
The default file type it saves as is .zip, if you want a different type, deselect Automatically select filename extension and append the extension to the end of your file name.
The next screen will allow you to select what you wish to backup, by default everything is selected.
The final screen shows the log of the backup up process. You can close the window once you have reviewed the log and verified your backup was successful.
To restore your backup, select within pimsettingexporter.


