Amarok/Guía de inicio rápido/La colección de música
La colección de música
El panel Fuentes de medios
El panel Fuentes de medios es el lugar que le permite navegar y mostrar su colección de música al completo. Esto incluye las canciones de su disco duro local, así como todas las que estén en dispositivos extraíbles o medios conectados a su equipo, como un CD de audio, dispositivos USB, reproductores, discos de red o fuentes en Internet.
Configurando una colección
¿Tiene archivos de música en formato mp3, ogg o FLAC en su ordenador? Comience diciéndole a Amarok donde encontrarlos, para que pueda comenzar a crear su colección. En el menú superior de la ventana: .
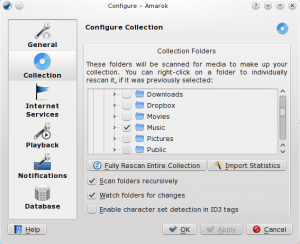
Una vista de árbol de su directorio personal se muestra arriba. Marque la casilla correspondiente a la carpeta en la que está su música, normalmente ~/Música. Luego elija . Esto llevará un tiempo, así que no se alarme si Amarok se ralentiza durante un rato. Una vez finalizada la exploración, lo mejor es cerrar Amarok utilizando el menú superior de , o Ctrl+Q, y reiniciarlo luego. Su nueva música debería mostrarse ahora en la sección Colección local.
Añadir dispositivos multimedia a la Colección
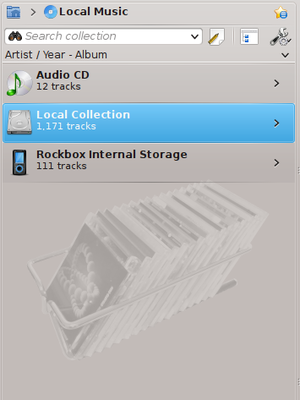
Bajo la barra de búsqueda cerca de la parte superior del panel Fuentes de medios verá diferentes dispositivos y/o categorías de contenidos en el Navegador de contenido. Si introduce un CD de audio en la unidad aparecerá en el panel Fuentes de medios, y lo mismo ocurre con Reproductores multimedia, memorias USB, y otros dispositivos USB. Después de montar una unidad externa debería mostrarse automáticamente en el panel Fuentes de medios. No necesita realizar ninguna acción más para ver unidades externas en su panel Fuentes de medios, siempre que sean reconocidas por su ordenador.
Abajo de muestra una captura de pantalla con tres fuentes conectadas: un CD de audio, un reproductor mp3, y la Colección local.
Copiar un CD a la colección
Si no tiene ningún archivo de música en su ordenador, es fácil ripearlos (copiar las canciones desde el CD a su colección). Simplemente inserte un CD, y haga clic con el botón derecho en el símbolo de la unidad de CD del Navegador de contenido para reproducir o copiar la música a la colección, lo cual ripeará y etiquetará sus canciones (vea la imagen de abajo). Si copia su música desde un CD de audio a su colección local, la barra de mensajes de la parte inferior de Amarok le indicará que está ocupado con el proceso de copia. El ripeado puede durar varios minutos. Una vez completado, el mensaje de la barra de mensajes desaparece y la música aparece en el navegador de contenido de su Colección local. Si la música no aparece en el panel Fuentes de medios lo mejor es salir de Amarok utilizando el menú superior de , o Ctrl+Q, y reiniciarlo. Ahora debería ver su colección en el panel izquierdo. La captura de pantalla de abajo muestra como mover canciones desde un CD de audio, iPod u otro dispositivo a su colección utilizando el menú que aparece al hacer clic con el botón derecho.
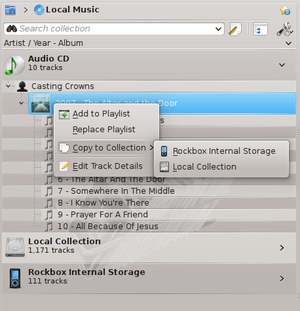
En el menú contextual de arriba, también se puede ver la opción . Use esta opción si tiene canciones que necesiten ser etiquetadas. Esto cobra importancia cuando ripee su música a formato .WAV, perdiendo algunas de las etiquetas. Si gran parte de su colección necesita ser etiquetada, considere software específico para esta tarea, como por ejemplo:
Un etiquetado correcto es importante para ayudar a que Amarok muestre sus canciones en los álbumes apropiados y en el orden adecuado. Aprenda más sobre ripear y etiquetas.
Accessing other media sources
You might have wondered why the Media Sources pane is not called the 'Collections pane'. Amarok gives you access to much more music than just your collection -- Internet shops, audio books, podcasts, music files stored outside your collection, and previously stored playlists. The Amarok breadcrumb navigation is the key to all of this. The starting icon for the breadcrumb navigation is the blue home folder icon at the extreme top left of the Media Sources pane. This icon expands and contracts as you browse through the Media Sources pane, allowing you to easily navigate your collection by clicking your desired folder in the breadcrumb bar.

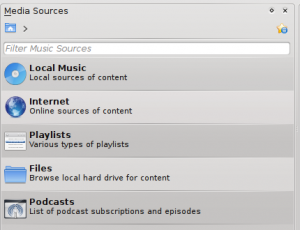
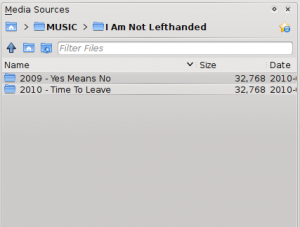
If you click the Amarok home folder you see the Media Sources pane on the left below, containing icons to available resources. If you click the Files icon (left image below, second item from the bottom), you will see something similar to the image on the right, below. Notice how the breadcrumb bar expands and how the content of the selected folder is shown in the Media Sources pane (right image below). Clicking the > symbols among the breadcrumbs allows you to view the folders available at that level of the folder structure. The Amarok file browser gives you access to your entire file system, even outside your Local Collection.
| Media Sources pane | Files Icon clicked |
|---|---|
 |
 |
The functions of the icons in the Amarok Home folder (left above) are:
| Icon | Name | Action |
| Local Music | Your Amarok collection | |
| Internet | Internet shops such as Magnatune, Jamendo and Last.fm. First configure your internet resources in: | |
| Playlists | Saved playlists -- see also Playlists. Also playlists on media devices | |
| Files | Your file system | |
| Podcasts | Access to Podcasts via RSS feed |
Clicking the Local Music icon above or on the Local Music folder in the Breadcrumbs bar returns you to your collection, showing you a list of all the available resources, artists, albums and tracks that you have previously defined as part of your collection. The Breadcrumbs bar indicates that you are viewing your Local Music.
Streams and Podcasts
There are two ways to listen to streams. If you have a favorite station, get the stream URL and add it: . You'll be able to find it again in Playlists, as a Saved Playlist. Otherwise, browse through the scripts available in our Script Manager (). There are some excellent collections available, which will show up in the Internet section of your Media pane.
Podcasts have their own section in the Media Pane, above. If you have an RSS or Atom feed URL, click the green and add it there. If you have an OPML file to import, that choice is available also. Use the context (right-click) menus to or mark an episode as New. If you are interested in browsing through a large collection of podcasts, check out the Podcast Directory available through the Script Manager, referred to above.
Using the Content Browser
The hard disk of your computer, audio CDs, external devices and the Internet are the basic resources for your collection. After your collection has been set up, it is likely that your collection will hold a large number of albums and tracks, much more than can be shown on a single window.
How to change the display of your collection, below:
Hiding or expanding information
The area of the Media Sources pane below the search bar is called the Content Browser. Three media sources are indicated in the image of a Content Browser below: CD, Local Collection and a Media Player:
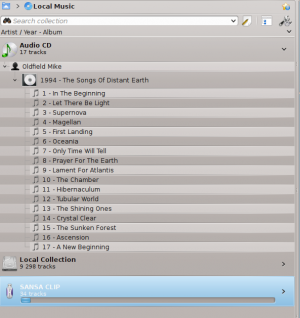
Clicking the banner for a device (the blue bar for the Sansa above) shows or hides the content of that device. The direction of the green arrow on the right indicates whether the contents for that device is hidden or shown. The content on a particular device can, in turn, be hidden or shown using the same principle, clicking on the appropriate artist or album. A - symbol on the left of an artist or an album indicates that the contents has been expanded. A + symbol indicates more contents for that category is available / currently hidden. In the image above, the information for Mike Oldfield - The Songs of Distant Earth CD has been expanded, showing the individual tracks. On the other hand, the albums and tracks in the Local Collection are hidden. By clicking these + or - symbols you also can expand or hide information.
Changing the order of tracks and albums
The order in which tracks are sorted in the Content Browser can be customised by using the Sort Options button at the top of the Media Sources pane:

The sort order is indicated on the top left of the Media Sources pane, just below the Search text box. The default order is Artist / Year - Album. The display order of the Content Browser can be temporarily switched between the user-defined sort order (described above) and a Merged view in which which artists are listed alphabetically, no matter on which media the music is stored. To toggle the Merged view,click the Merge icon at the top right-hand of the Media Sources pane:

To search your collection, type your search term into the search bar at the top of the Local Music section. Not only can you search by artist, album or track name, but any part. You might create a nice playlist by searching for winter, for instance, or merely find a track when you only remember one word of the title. You can also search by rating, playcount, even filetype. See Amarok Insider Issue 14 for more details.
Deleting items from the collection
You can delete any item from your collection by right-clicking on it and choosing the bottom item . A confirmation dialog will appear, preventing the accidental deletion of any tracks. More than one item can be selected with Ctrl+click.

